Animating Interfaces with Core Animation: Part 1

One of the greatest things about the iOS platform and applications people see on it is its beauty. Smooth gradients, consistent transitions, and animations that illustrate the transition of UI elements from one state to another. Animations are more than flashy eye-candy; they tell the user what’s happening. If an element is being deleted, instead of it simply disappearing it fades or slides out of view. Unlike traditional desktop or web applications where a “2 items deleted” statusbar message is necessary, these animations are in many cases enough.
Knowing where to start with animations can be a problem for developers though, because there’s many different steps involved. Instead of walking you through it fully here in the blog, I highly recommend you watch the WWDC 2010 videos on the topic. I truly mean it; anything I do here will simply be a rehash of that material, and I don’t see the point in reproducing perfectly good documentation unnecessarily.
- WWDC 2010 Session 123 – Building Animation Driven Interfaces
- WWDC 2010 Session 424 – Core Animation in Practice, Part 1
- WWDC 2010 Session 425 – Core Animation in Practice, Part 2
What’s a sample worth?

If a picture’s worth a thousand words, then sample code must be far more valuable. The WWDC videos are a wonderful starting place to understanding how UIViews and CALayers relate to one another, how different effects can be applied, and to see some of the common pitfalls you’d encounter as a developer. What they aren’t so great at doing is showing you how to actually apply those techniques to your application. Sometimes it involves a little fumbling about, or perhaps you don’t realize just how much you can use Core Animation to build your application.
For those reasons, I’ve put together a series of samples that illustrate different parts of Core Animation that I’ve found useful. My plan is to extend this sample project in subsequent blog articles.
Orbiting Planets sample
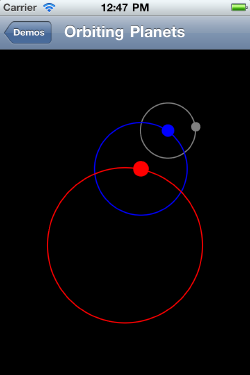
This sample was the easiest way to illustrate how nested layers in Core Animation are affected when animations are performed on them. I create a simple set of layers that shows a simple circle, with another smaller filled circle on its outline.
// Orbit #1
CALayer *orbit1 = [CALayer layer];
orbit1.bounds = CGRectMake(0, 0, 200, 200);
orbit1.position = self.view.center;
orbit1.cornerRadius = 100;
orbit1.borderColor = [UIColor redColor].CGColor;
orbit1.borderWidth = 1.5;
[self.view.layer addSublayer:orbit1];

CALayer *planet1 = [CALayer layer];
planet1.bounds = CGRectMake(0, 0, 20, 20);
planet1.position = CGPointMake(100, 0);
planet1.cornerRadius = 10;
planet1.backgroundColor = [UIColor redColor].CGColor;
[orbit1 addSublayer:planet1];
The first block creates a new 200×200 layer with a corner radius exactly half its width, meaning when the border is applied it will appear as a perfect circle. This is added to the current view’s layer property. Next, a smaller 20×20 layer is added to the first one using the same corner radius trick to make it into a circle, and this time the background color is set so that it appears as a filled circle.
The important thing to note in the above code sample is that any color properties that are set on a CALayer need to be a CGColorRef object, rather than a UIColor. I find it is easiest to use a UIColor to create your color objects, and then simply use the CGColor property of the UIColor class to derive the proper Core Graphics references.
Once the layers have been added, you need to create an animation to rotate the parent layer around its center.
CABasicAnimation *anim1 = [CABasicAnimation animationWithKeyPath:@"transform.rotation"];
anim1.timingFunction = [CAMediaTimingFunction functionWithName:kCAMediaTimingFunctionLinear];
anim1.fromValue = [NSNumber numberWithFloat:0];
anim1.toValue = [NSNumber numberWithFloat:((360*M_PI)/180)];
anim1.repeatCount = HUGE_VALF;
anim1.duration = 8.0;

[orbit1 addAnimation:anim1 forKey:@"transform"];
Let me step through line by line to describe what is happening here. The first line constructs a CABasicAnimation object, which is essentially the simplest type of animation object you can create. For most of your animations this is all you’ll ever need. By constructing the object using animationWithKeyPath:, we are specifying the specific property on the layer that we’re going to be animating, in this case the rotation component of the layer’s transform property.
Once the object is created, we need to customize the timing function for the animation. This tells the animation how to “curve” the values, allowing us to ease-in or ease-out our animations, making them seem more realistic. For our animation however we want it to use a “Linear” timing function, since we’re going to be looping this animation.
Next, we specify the “From” and “To” values for this animation. In essence this will be describing a single loop of our animation from beginning to end. Since we’re dealing with rotations, we’ll be using radians. Since the fromValue and toValue properties take an object reference, you need to wrap primitives in either an NSNumber or NSValue instance.
When you wish your animation to repeat, you can either set the repeatCount property to a specific number, or if you wish it to repeat infinitely you can use the HUGE_VALF value to specify you want the animation to continue indefinitely.
You set the duration you would like a single loop of your animation to take. This value is specified in seconds, so for short animations this value may be quite small.
Finally, once your animation object is complete, you add the animation to the layer you’d like the animation to operate on. This description may seem long, but it is only moderate biolerplate code that gives you a great deal of flexibility.
Once this same procedure has been repeated for the other planetary orbits, adding each set of layers to each other, the animation looks something like this.
Stay tuned for details on my other samples. For now however, feel free to download the sample project and pick through the code yourself.