Animating Interfaces with Core Animation: Part 4

This is the fourth in a series of posts I’m writing on animating iOS interfaces using Core Animation. In the first post I created a planetary orbit demo using nested CALayer objects. The second post showed how to dress up a UI by animating an image. The third post shows how you can trigger animations in response to button actions.
This post will show how you can create the beginnings of a full game using Core Animation combined with CAShapeLayer and UIBezierPath objects.
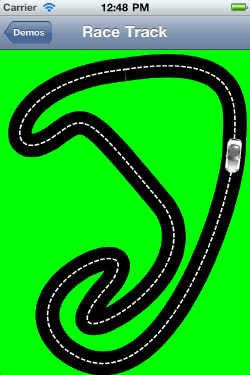
Race Track sample

This is perhaps my favorite sample, if only because it not only looks neat but shows how you can build an actual game using nothing but Core Animation. This sample shows how you can construct a car race track on the screen using CAShapeLayer objects, and can then animate an image of a car along that track. This sample’s code is broken down into five main blocks:
- Defining the path the car should follow;
- Drawing the black line that defines the track;
- Drawing the white dashed center-line of the track;
- Creating the layer defining the car;
- Animating the car along the path.
Luckily there are some handy routines for defining paths in UIKit. Core Animation deals with paths as CGPathRef objects, but luckily there is the UIBezierPath class that simplifies the process of drawing and creating a path object.
UIBezierPath *trackPath = [UIBezierPath bezierPath];
[trackPath moveToPoint:CGPointMake(160, 25)];
// ... Path drawing operations ...
I’ve omitted the actual path drawing code because it’s pretty verbose, but you can [download the source code][5] and sift through it yourself. Once the path has been created, you can use it as many times as you like. First we create a layer defining the black shape of the track.
CAShapeLayer *racetrack = [CAShapeLayer layer];
racetrack.path = trackPath.CGPath;
racetrack.strokeColor = [UIColor blackColor].CGColor;
racetrack.fillColor = [UIColor clearColor].CGColor;
racetrack.lineWidth = 30.0;
[self.view.layer addSublayer:racetrack];
The CAShapeLayer class isn’t used often enough I find; it is extremely powerful, and reduces the amount of processing the device has to do. Core Animation is fairly low-level, so instead of assigning the UIBezierPath object directly, you use the CGPath accessor that conveniently creates the low-level struct that it can understand. We specify the colors that we want the outline (the “Stroke” of the path) and the filled area to be, also using low-level CGColor objects.
We also specify a fairly wide width of 30 points and then add this layer to our main view’s CALayer object. An important thing to note is that the stroke color fills in on either side of the path, so the coordinates our path describes has 15 points of black on either side of it.
CAShapeLayer *centerline = [CAShapeLayer layer];
centerline.path = trackPath.CGPath;
centerline.strokeColor = [UIColor whiteColor].CGColor;
centerline.fillColor = [UIColor clearColor].CGColor;
centerline.lineWidth = 2.0;
centerline.lineDashPattern = [NSArray arrayWithObjects:
                              [NSNumber numberWithInt:6],
                              [NSNumber numberWithInt:2],
                              nil];
[self.view.layer addSublayer:centerline];
For the center-line of the racetrack, we create another CAShapeLayer object, filling out its properties similarly to the previous layer. In this case however we’re using a white stroke color, we’re using a much smaller line width, and we also specify a “Line Dash Pattern”.
This pattern describes where we want the path to be stroked, and where we want it to skip drawing the outline. You specify it in groupings of two, so for every 6 points of space along the line, there will be 2 points of blank space. This gives us a very nice dashed pattern.
One thing you may want to take note of is that we’re using the same UIBezierPath object to create the second layer. You can reuse that path as many times as you like.
CALayer *car = [CALayer layer];
car.bounds = CGRectMake(0, 0, 44.0, 20.0);
car.position = CGPointMake(160, 25);
car.contents = (id)([UIImage imageNamed:@"carmodel.png"].CGImage);
[self.view.layer addSublayer:car];
Next we create a regular CALayer for the image of our car. Notice how we assign the image to the layer’s contents? By using the CGImage property of our UIImage, it passes the content directly to the layer in a way it can understand, greatly reducing the amount of boilerplate code we need.
We also make sure to add the layer at the exact point where the path starts, so that the car lines up with the track.
CAKeyframeAnimation *anim = [CAKeyframeAnimation animationWithKeyPath:@"position"];
anim.path = trackPath.CGPath;
anim.rotationMode = kCAAnimationRotateAuto;
anim.repeatCount = HUGE_VALF;
anim.duration = 8.0;
[car addAnimation:anim forKey:@"race"];
Finally we create a CAKeyframeAnimation object on the “position” property. You might remember from my previous post about creating button action animations that a keyframe animation allows you to perform an animation along a path. In this case we’re creating a much more complicated path, but we’re using the exact same path used to create our CAShapeLayer objects above.
As shown in previous examples, we set the repeat count to infinite and a fairly long duration. But the important property is the rotationMode. By setting this to one of two potential values, the CAKeyframeAnimation object will automatically rotate the target layer along the path for you. If you’ve ever seen the game Harbor Master where you direct little boats along a path to their harbor? Or Flight Control HD where you direct planes to their airports. You can reproduce these same effects using simple CAKeyframeAnimation objects.
Finally, when the animation is added to the car, you see the effect shown in the video below.
I have plans to write more posts on Core Animation in the future, but for now this is all I’ve got. Feel free to download the sample project and pick through the code yourself. And don’t forget to read the previous samples showing Orbiting Planets, Floating Clouds and Button Actions.
