The past year has been quite a ride, to say the least! I have been so busy with work, creating awesome features and technologies on iOS apps that over a year has raced by without an update to my blog!
I’ve also been neglecting my own apps due to being so overwhelmed with the requirements of my work as the lead developer for Salesforce.com’s iOS Chatter app, so it wasn’t until recently that I updated Docset Viewer to add support for iOS 7. I’ve adapted the design to fit more in line with iOS7, while still providing the same experience as before on iOS6 and earlier.
In addition to iOS 7, I’ve added support for full-screen mode in landscape on iPad, hiding the sidebar. I also added search term highlighting in search results to make it easier to find the matching text you’re looking for.
Over the years my blog has transformed from the usual “Wordy geek ranting about first-world problems” content toward more educational and informative posts on what I do for a living: developing awesome iOS applications. I don’t usually talk about the actual applications I’m writing though, since most of my work is on other people’s apps (and I’m not allowed to spill the beans on anything fun). I still consider myself an “Indie” developer though, and just like many other developers out there, I like to solve the problems that I myself face on a daily basis.
In this case what started with me complaining on Twitter turned into a new app due to the resounding and immediate “Me too!” responses I got from some of my followers. And with that I decided to create Docset Viewer.
For as long as I’ve been a developer, there was only ever once when I had a machine that I felt was an adequate development workstation. That was around 2001 when I had a dual-proc 667MHz P3 768MB RAM and three 17″ CRT monitors. This baby put out enough heat that my home-office didn’t need a heater on during the rainy Seattle winters; in fact, it was so warm in there that I’d wear shorts, a tee-shirt, and left the window wide open.
At the suggestion of my friend Scott McWhirter, I decided to go to Ideas On Tap and keep an eye on the pulse of the Vancouver technology community. And after spending an evening drinking beer and talking with various people from companies around Vancouver, I began to feel like the only married guy in the middle of a speed dating session.
I have a stable and intellectually stimulating day job that I have no plans of leaving anytime soon, but it was still a nice ego boost to be flirted with by so many companies looking for bright talent. In Vancouver, at least, it seems like if you’re smart and you are a creative developer, there’s work out there to be had. In fact they can’t seem to get enough. But unfortunately for them, a lot of developers here are in the same situation I’m in – happy with their current jobs, challenged but not over-worked, and not too interested in changing anytime soon.
For the longest time it seemed that releasing an update to an iOS app was a random whack-a-mole process that I’d invariably get wrong in some way. It was maddening, especially since iTunes Connect has only recently become a decent web application. By switching to Jenkins for continuous integration of my iOS app builds I’ve greatly improved my process, but things didn’t really improve until I created a checklist for keeping track of my releases.
Since I’ve been asked many times about this very topic recently – both at work and on Twitter – I thought I’d write a post about how I bring some sanity to my release process so my app updates are timely and predictable.
One of my pet peeves is Open Source iOS libraries distributed as just a collection of Objective-C classes, rather than being bundled as a static library. I know a lot of people prefer it that way, but from a maintainability standpoint it really doesn’t make much sense to me. So when I’m faced with another library I want to use that doesn’t have a static library readily available for it, I typically wrap it up in my own Xcode project, check it in to Github, and configure my Jenkins continuous integration build server to compile it for me.
I thought I’d walk you through the steps I go through to make this happen, so you can use this technique too.
I’ve written about building iOS applications with Hudson Jenkins, but until recently there hasn’t been a convenient way of getting those applications to your testers. Of course the most important part of your build output will be the app bundle you send to Apple’s iTunes Connect web interface, but throughout your development cycle you’ll want to test your app. Sure you could build and deploy a debug build straight to your own personal device, but you get the most benefit from having other people beta test your app.
With recent releases of Xcode and the iOS SDK, Apple improved their AdHoc distribution support with two main enhancements:
Mobile provisioning files can now be embedded in the App’s IPA itself, meaning you don’t have to maintain and update separate .mobileprovision files separately;
A specially-formated manifest Plist file can be created that, when linked to properly, allows test devices to install new versions of your AdHoc app without needing to plug into a computer to sync the app using iTunes.
These improvements are huge, but require some changes to your build scripts and your Continuous Integration environment. I’d like to show you how to do this in your own installations, and show you some options for how to distribute your apps to your testers.
Recently I was working on a refactor of one of my CPAN modules which, among other things, involved changing its name from Test::A8N to the specific Test::Story. Doing so made me think about the process I usually go through when I consider releasing a CPAN module.
I do most of my mobile development literally while I’m mobile; on the train during my morning commute, from coffee shops on the weekend, or in front of the TV in the evenings when I’m winding down for the night. Because of this, I don’t have any consistent time when I’m making checkins, nor do I have the time to create builds for my beta users.
My friend Scott McWhirter, who heads up the Vancouver Perl Monger’s group, asked me yesterday to give a last-minute talk on anything in particular at tonight’s Vancouver.pm meeting. He wasn’t exactly begging, but I know he’s short on speakers this month, and he wanted something interesting to show.
So I decided I’d talk about building and testing Perl-based projects using Hudson. I’ve been planning on writing a blog post on the subject for the past month, but haven’t found the time to finish off the post properly. So if you’re interested in the topic, and you don’t want to wait for me to get around to writing about it online, please feel free to drop by tonight!
As any iPhone application developer who’s released at least a single app to the App Store will tell you, releasing your app is a terrible pain in the…well, it’s not a fun experience. After your second or third app you start to get the hang of things, but there’s still pain and suffering involved. Managing certificates, getting settings configured properly, and iterating between development, AdHoc beta builds, and the final App Store release builds, all make the process seem tediously manual and prone to human error.
My father, Fred Nachbaur, died of cancer in September of 2004. He was 53 years old. I had just moved to Canada not long before, and our relationship, which had always been complicated, never got the resolution that I think both of us probably wanted. He was brilliant, generous, stubborn, private, and deeply creative. He was a musician, an electronics/radio engineer, a programmer, and by all accounts the kind of person to whom cats would climb into his lap on a first visit.
I didn’t know him nearly as well as I wish I had, and the side I saw of him was very different than the one that others saw.
Many people have heard the phrase “Don’t live to work; work to live”. This usually means that the goal of working should be to enable you to live your life, rather than allowing work to consume your life. Far too many people in the tech industry sacrifice their families, spouses, children, and even their sleep, in order to make it in this industry.
I’ve been using git for all my new software development and have been converting my old Subversion (and gasp CVS) repositories over. Throughout this process I keep learning more and more about git, and my love story with it continues every day. Thanks to my friend Chris, he sent along this blog posting that really describes how you can do hardcore agile software development in teams with git. This really is helping me solidify in my head what it is I want to do, but have just never had the tools or know-how to put into practice.
Like many people before me, and I’m sure many more after, I’ve had an ungodly amount of difficulty with Apple’s iPhone certificate provisioning system. I personally think it’s a brilliant solution to a difficult problem, but unfortunately for us they made it a pain in the ass to deal with. I’ve only run up against a few basic issues with them, and thought I’d document my solutions to them here.
I’ve said it many times before, but as programmers we tend to spendthe bulk of our time working with broken software, and we try to endeavor to make it less broken. When it’s not broken enough to keep people from using it on a day-to-day basis, you release your software. Some places do this better than others, and at my day job we’re really good at it. We are very dilligent about our software releases, we have tons of unit tests, system test automation, a nightly test “dashboard” that shows us how well our tests passed, and so forth.
I’ve recently begun drinking the koolaid of Git, and damn it’s tasty! The things I can do with git that I couldn’t have done before (or would have been difficult to do) makes me excited about it. In fact, the one feature that I thought was a drawback — the no-one-true-server nature of it — is actually its strongest selling point.
See, the way I’ve taken to doing my development now is I create two “remote” repositories. First is “origin” which points to a repository managed by Gitosis. Second is a “live” repository that points at a working directory on my production server. That working directory is where my live site actually runs in.
On the train ride to work today I was listening to “Daft Punk” on my iPhone while reading my blogs, my usual morning activity. And as my mind wandered, the song “Harder, Better, Faster, Stronger” came on; it’s one of my favourites, as I’m an avid electronic music fan. But since I was reading Ajaxian and several other software industry business blogs at the time, the song seemed strangely appropriate. Everyone is trying to find ways of working harder, developing better software, releasing to market faster, and having a much stronger market position (honestly, this is what was running through my head). This made me think more about what I do to fulfill those 4 business goals, so well voiced by Daft Punk.
I’m happy to share that today is my 2-year anniversary at Okta! This would make more sense if I’d originally announced on this blog that I’d changed jobs and started working at Okta, so I’ll take a moment to recap what’s happened in the past two years, and some of the milestones and accomplishments I’m most proud of.
Before joining Okta, I worked at Salesforce for 10 years, and had many opportunities to move around within the mobile organization to kick start new products and teams, solve complex challenges, and grow personally and professionally along the way.
I feel that every few years I write a post like this. It’s filled with statements like “Life got busy”, or “I had a problem with my server and didn’t notice”, or some other reason that seems insignificant in the grand scheme of things.
This time around though I have a very good reason for a 5-year break in my blogging activities. It started out as being just generally busy with travel, and ended up with the birth of my beautiful daughter who, at the time of this writing, is about to have her 3rd birthday. It’s been a very fulfilling experience that regardless has eaten up any spare time I have for such frivolities as blogging.
So let me take this moment to recap the past few years to kickstart my blog again!
My life is pretty darned busy right now. Transitioning to a new job, travel for work, helping @dccp with her travel arrangements for her academic conferences, my own iOS projects, and my blog. Since the time I have available to work on my own coding experiments is limited to evenings and weekends. I’ve been recently attempting to focus on just one or two projects at a time, since for a while there I was coming up with at least 3 new prototypes per week. Focusing on myDrumPad has really made it easy for me to give it the extra polish and attention it needs to take it to the next level. However, since I started participating in NaBloPoMo, the National Blog Posting Month, this has been consuming a great deal of my free time.
I’m a fairly decent web designer. I’m not great by any stretch of the imagination, but I’m not really visually creative. I tend to express my creativity in the apps I build, as well as in my writing. So given the fact that I’m really proficient in CSS and HTML, I can make simple web applications look good if I don’t have the help of a designer. That being said nothing replaces a great UI designer, who are worth their weight in gold!
Because of my friend Chris Simmons, I’m going to try my hand at NaBloPoMo, the National Blog Posting Month. As if people didn’t write enough drivel on the Internet when they have something substantial to say, people are encouraged to blog even more with nothing at all to motivate them.
Okay…I’ll bite. I’ve been meaning to be more consistent in my blogging lately anyway. So starting today, I’m going to attempt to blog every day for the duration of this month. After all, I was somewhat upset over the fact that I didn’t have time to participate In NaNoWriMo yet again this year. So if I can limit myself to a blog post per day, perhaps next year I can finally get myself to the point that I can finish a draft of that SciFi novel vie been meaning to write for years.
I really don’t like making tweaks to my blog itself, since I’d much rather be writing my blog posts themselves, or the software I talk about in my blog. So any time I spend working on just the blog software’s configuration feels like wasted time. But frankly, while I liked the simplicity of Blogger for all my previous entries, it was just getting on my nerves.
I didn’t like the editor interface, I didn’t like how difficult it was to tweak the HTML and theme settings, and frankly it was just too difficult to update. And since I run my own server and manage my own websites on it, I figured to hell with it. I’ve started migrating to WordPress (it saddens me that I’m not using Perl for my blog, but alas, I have no time to tweak anything).
My interactions with marketing has been very spotty throughout my career. I know and accept that marketing plays a huge role in business, both online and offline, but I just can’t seem to wrap my head around it. I’m one of the types of people that create. Those that sell, and those in the middle that help both types around them either create or sell, are very useful. I just can’t figure out what the hell it is that they do.
My wife and I had to go up to the interior of BC to clean out an old storage unit of the junk I don’t need anymore, and close it up for good. Luckily for us this went faster than we’d expected. Instead of 1-2 days of cleaning and carting stuff off to the thrift store, it was 2 hours of sorting through what I wanted, and left the rest to be picked up by the thrift store on Monday.
I think work wrecked my brain a bit today. I have so many ideas running through my head, and just not enough time to catch up to them all. It happens to all of us from time to time, but the thing is I have so much fun with work, that it’s hard to moderate myself. I think I’m going to head home, listen to some Bob Marley, and when I meet up with my wife and her parents at the pub, I’m going to watch the hockey game, drink some beer, and enjoy my evening without technology.
So my wife is probably one of the coolest geeks I know. Would you like to know why?
We were just watching the intro for a new episode of The Simpsons where Comic Book Guy ate a dinner, and finally was given the bill which showed, among other things, the tax. So, she pulled out a calculator, figured out the food service tax percentage, and went straight to Google to see which state Springfield is in.
My wife and I don’t celebrate Valentines Day. This is for several reasons, but the biggest reason is that we don’t like being made to buy overpriced flowers and chocolates, pay for overpriced restaurants, and buy overpriced cards that convey generic and meaningless messages of love to someone I already love and have far more profound ways of expressing it than what Hallmark has cooked up. So basically, we’re both jaded and cheap.
Apparently buying a GM car 8 years ago entitles me to recieve a wonderful little email from GM about the proposed bailout. It seems they’re trying to stem the flood of people abandoning them in the wake of the US bailout.
Dear Michael Nachbaur,
You made the right choice when you put your confidence in General Motors, and we appreciate your past support. I want to assure you that we are making our best vehicles ever, and we have exciting plans for the future. But we need your help now. Simply put, we need you to join us to let Congress know that a bridge loan to help U.S. automakers also helps strengthen the U.S. economy and preserve millions of American jobs.
Yesterday at the Elephant & Castle Pub I was talking with a friend who’s decided to finally take the leap and move into doing business as a free agent. He’s filing all the business applications, getting consulting jobs (he already has 2 long-term gigs lined up), and is going through the motions of becoming his own business entity. All that’s left is a name.
Web businesses aren’t bound by the same requirements of conventional businesses to have a relevant name, but we have different problems. Do we pick a name from a bag of industry buzzwords, and sound like we’re the company from Office Space? Do we create a name that accurately reflects what you do as a business, and sound like a group of pocket-protector-wearing dweebs? Or do you go to an extreme and invent a unique name that means absolutely nothing, and gives the customer no inkling of whether or not you’re a business or a toilet scrubber? That last one feels like the DotCom days all over again, and while it may have worked then, I doubt it would lend much credibility these days.
I haven’t had anything resembling a blog in years, and while I have had quite a lot to say in the past, I felt as if no one would really care one way or the other. This impression has changed recently, since I’m once again working in an office environment, and my interactions with co-workers shows that I do have some bits of wisdom rattling around in my brain that’s worthwhile sharing.
Many people have heard the phrase “Don’t live to work; work to live”. This usually means that the goal of working should be to enable you to live your life, rather than allowing work to consume your life. Far too many people in the tech industry sacrifice their families, spouses, children, and even their sleep, in order to make it in this industry.
As some of you may be aware, I have enough allergies to various common foods to have earned the name “bubble-boy” from my friends. In fact, my wife’s friends used to semi-joke about me while we were first engaged that she should take a good life-insurance policy out on my, “just i n case”. She used to laugh at that, until she had to race me to the hospital a couple times, or stay up all night to make sure I didn’t stop breathing. Now it’s not a laughing matter. Now she’s paranoid for me wherever I go, always carries a spare epipen with her, and arranges our travel schedules around flights and hotels that can accommodate allergies.
Passwords are definitely fickle beasts. I’m used to juggling a multitude of different semi-incomprehensible passwords containing a mixture of numbers, symbols, upper and lower-case letters, and in some cases unicode characters (letters such as ü, • and §). And for some mysterious reason I’m able to remember these gibberish-filled passwords with ease. But despite all this, when asked to input a 4-digit passcode into my iPhone to be able to lock my phone (a requirement for hooking it up to my company Exchange server), I couldn’t keep that simple password in my head for longer than 8 minutes.
Last night while watching TV I had a conversation with my wife Deanna that made me realize that she is, as far as I’m concerned, a Jedi Knight.
I never really have that much of an appetite, and it’s not uncommon for me to skip meals altogether. Since yesterday we had a late lunch, I ended up skipping dinner. Normally it wouldn’t be a big deal, except that I thought I’d forage for a little snack in the evening. After a cursory scan through the kitchen I didn’t find anything that sat comfortably below my laziness threshold, so I decided to forego eating anything at all.
Today, I’m proud to announce that I’m officially a Canadian Citizen! I’ve lived in Canada for 7 years now and almost all of my family lives here, but since I was born in California, I’ve technically been an American for all that time…until today.
No longer will I have to sheepishly explain myself when US teams play against the Canucks. No longer will I have to carry a stupid Permanent Resident card with me when flying home to Canada. And probably most importantly, I no longer will I have to worry about losing my immigrant status if I need to stay out of the country for more than 6 months in a year.
Some of you who follow me on Twitter may have noticed recently that I’ve been talking about working for a new company. This week is my first week working for Salesforce.com. I’m really excited about the move for a number of reasons, some of which I’ll go into here.
As of this past Monday, I’m now a full-time iOS developer, instead of being limited to evenings and weekends. I’m a new addition to an amazing team of developers at Salesforce.com developing apps to be released to the App Store, utilizing their amazing cloud-computing infrastructure. From a technology standpoint this is right up my alley, and the company seems to have a great commitment to quality, agility and a good work environment.
I’m an avid “Idea Man”. I love coming up with new ideas; for iPhone apps, for web apps, and even for real-world inventions. Most of my ideas only sound great in my head, but when I open my mouth the idea seems to turn sour. A smaller number of ideas manage to survive the thought-to-word boundary. An even smaller minority of those ideas manage to make it down onto my “Idea Book” that I use to keep track of all the potential projects I’m going to work on. Admittedly it’s not so much a single “book” as a collection of binders, scraps of paper, and in some cases 3×5 index cards.
Wow the past few months have been quite a wild ride, and a ton of things have happened! So much has gone on and I’ve been writing so much software that I haven’t had the time to blog about it. In the time I’m not writing software, I’d rather spend it with my wife than spend it writing about the software I’d written.
Over the past few months, while the PhoneGap team started a major refactor of their codebase, I spent some time learning more about Objective-C and UIKit, and discovered that writing native software on the iPhone is a heck of a lot easier than I’d previously expected. It shouldn’t have surprised me, because I’ve heard rave reviews from developers I have a great deal of respect for, and it also shouldn’t come as a great shock that Apple treats their developer SDKs with the same degree of polish and attention-to-detail that they do to their hardware. So while I was working with PhoneGap I’d contributed a number of plugins exposing the iPhone’s native UI elements to JavaScript-based apps, I’ll no longer be updating or adding any new plugins.
Just like most of the men at my office, I’m participating in Movember this year, largely due to the razzing I got last year when I didn’t participate. Yes, I’ve succumbed to peer pressure…what would my mom say? At least it’s for a good cause. Of course, the first question I asked is “What’s Movember?” It’s a fundraising event for prostate cancer where men grow mustaches during the month of November.
You know that feeling when you listen to a song that you love so much, you re-play it 3 times in a row? You also know that feeling when people tell you “ZOMG you’ve gotta listen to, you’ll love it” and you say “yeah yeah, sure, sometime…” and you never bother ’till “sometime” eventually comes along, and you think “Why the hell didn’t I listen to this earlier?!” Well, I’m doing that right now with “Miss Murder” by AFI. I’m on my 3rd play through in a row, and I’m seriously considering starting it over…
I love living in Canada, and I especially like living in Vancouver. I wouldn’t trade it for anything. I have a lovely wife, a great job, a wonderful city…what more could I ask for? Oh right, that’s it…warm weather! I’m not meant for frozen water falling from the sky, or bundling up into so many layers that I feel like an onion (or a parfait).
I don’t like the cold. I especially don’t like it when my office building thinks it’s still June. I felt warmer waiting in the snow for my bus this morning than I do right now at my desk.
Someone on Twitter recently asked how to implement a TableView header that will stretch and resize as the content is scrolled, so I thought I’d spend a few minutes to provide a good example. Since I thought it’s a neat trick
that’s often overlooked, I felt it was worthy of wrapping a post around it to explain how it works, maybe giving others the ability to replicate this pattern for themselves.
One of the “delightful” features of iOS is the almost imperceptible UI effects they add to give the illusion of depth. One of the most under-appreciated features is UIMotionEffect, which ties the device’s gyroscope to your views to make them adapt to how the user moves their phone.
This can be seen throughout iOS, from your lock screen to your app icons in Springboard (the iOS app launcher). Done right, the user won’t consciously notice these views moving, but it helps set certain views apart from the rest of the app’s UI, helping them “pop” and be more noticeably separate from the rest of the app.
In this post I’ll go over what UIMotionEffects are, how they work, and will share my approach for simplifying how to add motion effects throughout your application.
UIAppearance is analogous to CSS for UIKit, while being compatible with both Interface Builder and traditional styling in code, without sacrificing performance. It’s a way of declaratively assigning UI style values to your views, without needing to manually tweak settings throughout your codebase. This makes it easy to define your app’s visual style centrally, which makes maintenance simpler when changes are necessary.
In this post, I’ll talk about how you can define your own custom UIAppearance properties in your views, allowing you to declaratively style your app giving you more flexibility and reusability.
When working with iOS apps (or really anything within Apple’s ecosystem) I’ve sometimes found the need to deeply introspect the libraries and executables built in my project to answer questions like “Is bitcode enabled for all architectures?” or “Which architectures was this binary compiled for”, and so forth.
These aren’t easy questions to answer unless you know your way around the command-line, and which commands to invoke. So I thought I’d go over how to analyze compiled binaries, and share some helpful scripts I wrote to simplify the process.
Everyone has a love/hate relationship with bug reports. For the user, they’re a nuisance to file. For the engineer receiving a bug report, it means extra work and the sad realization that your product isn’t perfect.
I’ve been frustrated with Apple’s handling of bug reports just as much as everyone, but haven’t really thought much about it recently. But with some recent talk on the topic, I felt like playing the devil’s advocate and wanted to share a few thoughts in defence of Apple’s engineers.
I recently wrote about Cocoa / Cocoa Touch frameworks, and in writing about it I was sorely tempted to dive into Modules, since they are pretty important to modern frameworks. But it was such a huge topic, I decided to break it out into a separate post.
In a nutshell, LLVM Module Maps were invented as a way to improve how source code imports other frameworks.
If you’ve ever worked on traditional C/C++ software projects (Makefile, CMake, gcc…any of these ring a bell?) you’ll know that the more code you add, the longer it takes to build, and the more likely you are to have conflicting types or macro definitions.
When working with iOS apps (or really anything within Apple’s ecosystem) I’ve sometimes found the need to deeply introspect the libraries and executables built in my project to answer questions like “Is bitcode enabled for all architectures?” or “Which architectures was this binary compiled for”, and so forth.
These aren’t easy questions to answer unless you know your way around the command-line, and which commands to invoke. So I thought I’d go over how to analyze compiled binaries, and share some helpful scripts I wrote to simplify the process.
I recently wrote about Cocoa / Cocoa Touch frameworks, and in writing about it I was sorely tempted to dive into Modules, since they are pretty important to modern frameworks. But it was such a huge topic, I decided to break it out into a separate post.
In a nutshell, LLVM Module Maps were invented as a way to improve how source code imports other frameworks.
If you’ve ever worked on traditional C/C++ software projects (Makefile, CMake, gcc…any of these ring a bell?) you’ll know that the more code you add, the longer it takes to build, and the more likely you are to have conflicting types or macro definitions.
If you don’t know the nuts and bolts of how your code is compiled, linked, and executed on target devices, you aren’t alone. And lets be honest, this is perfectly fine! That’s the great thing about abstraction: not everyone need be an expert at everything in order to be effective.
There are times though where a little bit of knowledge can go a long way to help troubleshoot particularly onerous problems. So I thought I’d explain a bit about how apps work in Cocoa (and by extension, Cocoa Touch), particularly how frameworks work.
You know how many times, as an iOS developer, you want to ensure some method or delegate call occurs on the main thread? We do this dance countless times, and while it’s straight-forward enough, it can be a burden sometimes.
Here’s an easy way to keep your thread access safe, without having to write a lot of code in the process.
Consider the following situation that happens far too often in mobile app development: You’ve just released an app that works perfectly for you, and you’ve tested it extensively. You’re proud of your accomplishments and submit the app to the world, only to have several emails sent to you from users who have nothing but difficulties in running the app. You send a bug fix release to the App Store, but since you’re still unable to reproduce the problem you’re at the whim of luck and end-user feedback. You can hope your users know how to send you a crash report, but what if the app isn’t actually crashing? Wouldn’t it be great to be able to access your app’s log information from that client to be able to troubleshoot the problems?
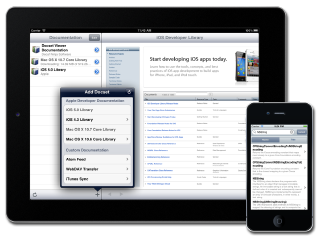
I’ve recently released version 1.2 of Docset Viewer, which fixes a number of bugs people experienced with the previous version. If you had problems with the previous release, please give this one a try.
One of the improvements I’ve added is the ability to customize whether or not you would like to back up your Docsets (which can get quite large) into iCloud. To keep with the instructional nature of this site, I’ll show you how you can do that in your own apps.
As I’ve shown in my previous post announcing Docset Viewer, I want this series of posts to be more than me talking about my new app. In keeping with the instructional nature of my site, I’m going to show you a few things that I did in my new app Docset Viewer and how I put it together. This time around I’m going to show how I use NSURLConnection for downloading large files, and even resuming them.
In Docset Viewer I’ve added the ability to download docsets directly from Atom feeds, either from custom URLs or from a pre-configured list of Apple’s available docsets. Since you may not be consistently connected to the Internet, it’s important to be able to download documentation packages incrementally, especially since they can be anywhere from 300MB to 500MB.
Over the years my blog has transformed from the usual “Wordy geek ranting about first-world problems” content toward more educational and informative posts on what I do for a living: developing awesome iOS applications. I don’t usually talk about the actual applications I’m writing though, since most of my work is on other people’s apps (and I’m not allowed to spill the beans on anything fun). I still consider myself an “Indie” developer though, and just like many other developers out there, I like to solve the problems that I myself face on a daily basis.
In this case what started with me complaining on Twitter turned into a new app due to the resounding and immediate “Me too!” responses I got from some of my followers. And with that I decided to create Docset Viewer.
For anyone who’s developed exclusively with UIViews on iOS may take the title of this post a bit oddly. “WHAT?!” they might say, “Are you insane? Core Graphics is not only a C-only API, but has confusing function names, and needs way more code to do the same thing I can do in less code in UIView”. Yes, they might be right, but there’s a reason why Core Graphics exists. It’s FAST!
But using Core Graphics doesn’t mean that your code has to be confusing, or that you have to compromise flexibility for performance. You can have your cake and eat it too (aka you can have high-performing code that is easy to read). Read on to see what I mean.
As developers we spend most of our lives dealing with broken and barely-functional software: our own software. We do our best to make the applications we develop somewhat less broken and try to add features to make it functional. And once we finally get our software working bug-free and functioning stably, what do we do? Do we bask in the joy of a stable app and spend countless hours enjoying that moment? No, we move on to v1.1 or v2.0, adding more features and consequently more bugs. It’s kind of sad if you think about it.
Since much of our lives are spent with applications in various states of brokenness, understanding how to debug our software and catch those exceptions that arise is vital to getting our applications to a stable state so we can release, consequently moving on to create a whole new set of bugs that need to be fixed.
Here are some basic tips and tricks to make your life easier dealing with Xcode 4, and tracking down those places where your code runs off into the bushes.
One of my pet peeves is Open Source iOS libraries distributed as just a collection of Objective-C classes, rather than being bundled as a static library. I know a lot of people prefer it that way, but from a maintainability standpoint it really doesn’t make much sense to me. So when I’m faced with another library I want to use that doesn’t have a static library readily available for it, I typically wrap it up in my own Xcode project, check it in to Github, and configure my Jenkins continuous integration build server to compile it for me.
I thought I’d walk you through the steps I go through to make this happen, so you can use this technique too.
With iOS 4.0 Apple introduced two new technologies to the iOS platform: Grand Central Dispatch, and blocks. Simply put, it is to multi-threaded programming what fire is to a barbecue. Sure you can do without it, but the end result is much better.
Despite all this, developers still seem to avoid using it. Some of the reasons for this, off the top of my head, could be backwards-compatibility for older versions of iOS, unfamiliarity with the funky syntax it uses, or simply a lack of practice. The biggest thing I find however is a general misunderstanding about the importance of multi-threading among new developers, which was made worse by the difficulty of dealing with threads before blocks and GCD was released.
Fortunately there’s no reason to avoid multi-threaded programming in iOS, but before I dive into the specifics I’d like to point out just how important it is to use an asynchronous approach to development on iOS, or any mobile platform in general.
One of the things I like most about Apple’s iOS SDK is the consistent and easy-to-use API they provide. Across all their different frameworks there’s a pattern at work that makes using their classes easy to understand. This is due in part to the simplicity for configuring those objects. In most cases you don’t need to call cryptic methods to setup or teardown classes. If you want to change a label’s font, you just set a property. If you want to add a new set of tabs to a UITabBarController, you simply have to assign an array of view controllers to the “viewControllers” property and away you go.
Following up on my previous post in this series, I’m going to continue talking about beginner topics that I and many other developers take for granted. So for this entry in my “Back To Basics” series I’d like to talk about UITableViews, and how to simply and easily construct one without convoluted or confusing code.
This topic in particular is something I’ve struggled over in the past and never managed to find a clear example for how to get started. Certainly there’s a lot of examples to show how to construct a table view, how to create a datasource for it, and the basics for how to construct cells. But hardly anyone tells you how to easily and conveniently construct a menu of options without going down a maze of twisty passages.
So today I’ll show you how you can use simple “typedef” structures to describe and control a simple menu of options.
These days I’ve been working on some fairly advanced iOS development techniques on my various projects: I’ve taught myself (badly) about Core Audio, I’m learning OpenGL, I’m developing a series of applications using Core Data, asynchronous parsing of JSON from a streaming HTTP connection, etc. It’s extremely fun and easy once you understand the basics.
What I tend to forget however is that you have to crawl before you can walk, and many people still struggle with some of the simpler techniques that I’ve learned that may not be so obvious, even when reading books or tutorials on Objective-C programming.
Since my previous series of articles on Core Animation (Part 1, Part 2, Part 3, Part 4) were so well received, I thought I’d do another series of articles titled “Back To Basics”.
So without further ado, I give you the first part in my series: Positioning UIViews.
Like most developers, I look to Apple’s default application templates to get up-to-speed on what would appear as being the Right Way™ of developing apps on iOS. In practice however what you need to realize is Apple’s templates are meant to be the easiest introduction to a set of tools that can be fairly complicated for beginners to understand. Core Data is one of those areas. The problem is when you try to grow your application you’ve built on top of Apple’s sample template. You’ll experience some annoying growing pains, and will need to give your code a thorough washing and a fresh coat of wax to be able to mature your application.
In my code I’ve learned to share and reuse my classes with other applications I’m writing by encapsulating a lot of the boilerplate into reusable classes, as well as wrapping my whole Core Data model in a reusable static library. This wasn’t the most intuitive thing to get right, but now that it’s done it was really worth the effort. Let me show you how it’s done.
I’ve written about building iOS applications with Hudson Jenkins, but until recently there hasn’t been a convenient way of getting those applications to your testers. Of course the most important part of your build output will be the app bundle you send to Apple’s iTunes Connect web interface, but throughout your development cycle you’ll want to test your app. Sure you could build and deploy a debug build straight to your own personal device, but you get the most benefit from having other people beta test your app.
With recent releases of Xcode and the iOS SDK, Apple improved their AdHoc distribution support with two main enhancements:
Mobile provisioning files can now be embedded in the App’s IPA itself, meaning you don’t have to maintain and update separate .mobileprovision files separately;
A specially-formated manifest Plist file can be created that, when linked to properly, allows test devices to install new versions of your AdHoc app without needing to plug into a computer to sync the app using iTunes.
These improvements are huge, but require some changes to your build scripts and your Continuous Integration environment. I’d like to show you how to do this in your own installations, and show you some options for how to distribute your apps to your testers.
This is the fourth in a series of posts I’m writing on animating iOS interfaces using Core Animation. In the first post I created a planetary orbit demo using nested CALayer objects. The second post showed how to dress up a UI by animating an image. The third post shows how you can trigger animations in response to button actions.
This post will show how you can create the beginnings of a full game using Core Animation combined with CAShapeLayer and UIBezierPath objects.
This is the third in a series of posts I’m writing on animating iOS interfaces using Core Animation. In the first post I created a planetary orbit demo using nested CALayer objects. The second post showed how to dress up a UI by animating an image.
This time I’ll show how you can trigger animations in response to button actions to illustrate to the user that an action is taking place.
This is the second in a series of posts I’m writing on animating iOS interfaces using Core Animation. In the previous post I created a planetary orbit demo using nested CALayer objects.
This time I’m going to show how you can dress up a UI by creating a simple effect using an image and Core Animation.
One of the greatest things about the iOS platform and applications people see on it is its beauty. Smooth gradients, consistent transitions, and animations that illustrate the transition of UI elements from one state to another. Animations are more than flashy eye-candy; they tell the user what’s happening. If an element is being deleted, instead of it simply disappearing it fades or slides out of view. Unlike traditional desktop or web applications where a “2 items deleted” statusbar message is necessary, these animations are in many cases enough.
Knowing where to start with animations can be a problem for developers though, because there’s many different steps involved. Instead of walking you through it fully here in the blog, I highly recommend you watch the WWDC 2010 videos on the topic. I truly mean it; anything I do here will simply be a rehash of that material, and I don’t see the point in reproducing perfectly good documentation unnecessarily.
WWDC 2010 Session 123 – Building Animation Driven Interfaces
WWDC 2010 Session 424 – Core Animation in Practice, Part 1
WWDC 2010 Session 425 – Core Animation in Practice, Part 2
I’ve often been asked by people about where to start with iOS programming, whether they be co-workers, colleagues in the same line of work at other companies, or even total strangers who happen to see me happily working away on my personal projects in Xcode. Some rather naïve people assume that I learned from a book, still others even think I took a class to learn all of this! I can say definitively that it’s in my opinion that to be a great iOS developer, you just need to write apps, and lots of them. Experiment, try different things out, and more importantly, buy a few really good iPad and iPhone apps so you can see for yourself the design patterns that make good apps, and those that make poor apps.
I recently had to improve the performance of a few views that utilized CALayer-based shadows on rounded-rect UIView objects. On this particular iPad application, when the device was rotated, the views rotated quite a lot slower than we would have hoped. It wasn’t a show-stopper, but the jerky rotation animation made it look cheap and unpolished. The easiest way to have our cake, and eat it too, was to set a custom CGPath to the layer’s shadowPath property. This told UIKit to set the inside of the path to opaque, reducing the amount of work the rendering engine needed to perform.
For myDrumPad the main pad buttons are images. I create a UIButton object, and use setBackgroundImage:forState: to customize which image will be used for each state (UIControlStateNormal and UIControlStateHighlighted mainly). I customize the title label font, shadow and color, and voilà I have a pad button that simulates the look and feel of a Korg padKONTROL. There’s just a few small problems with it.
The images on the iPad are fairly large, and memory is at a premium.
The size of these buttons can change in portrait vs. landscape. It’s time-consuming to export different versions from Photoshop for the different orientations.
The buttons are sized differently depending on the size of the button grid (e.g. a 3×3 grid of buttons have larger images than 4×4 or 5×5 grids). If I resize these images on-the-fly, then the edges look blurred and aren’t well-defined.
The retina display complicates all of this, meaning I have to have two versions of each image.
I want to be able to customize the buttons to have different colors when you’re on different drum sets.
Because of that long list, simply using an image isn’t good enough. But instead of drawing my images using regular Core Graphics drawing routines, I’m going to use Core Animation Layers, or CALayers, to accomplish the same thing. Ultimately I want my buttons to be able to be animated, to change color, and to feel more “alive” than a static image could accomplish.
Boomle is by far the lowest-selling app I have published on the iTunes App Store, and sadly as a result I just haven’t had the motivation to dedicate more time to it. However it’s times that I see people using it in person that I see just how much people enjoy playing it. I really hope I’ll have time to revisit it, because it’s one of those games that people just “get”, and is enjoyably challenging throughout the whole game.
One of the things that’s hard as a developer is keeping your legacy code up to date. It’s all too easy to fire-and-forget; write your code, debug it just enough so that it compiles, and then forget it until it breaks again. I’m guilty of that as well. In fact, just today I discovered that my continuous deployment configuration for Boomle was broken…for the past 3 months.
After merging my code from a private repo over to Github, it still didn’t work. After updating the Hudson build configuration to point at the proper repos and to respond to the proper webhooks (to get automatically triggered on a new check-in), it STILL didn’t work. You see, not only does configuration change, but SDKs and APIs shift out from under you. The iOS SDK had changed out from under my project, and the Xcode configuration was pointing at libraries and SDKs that no longer were shipped by Apple.
As with most things, the amount of work we as developers see when starting an iOS application is just the tip of the iceberg. There’s artwork, “About” screens, tutorial pages, icons, the app’s website, and all the marketing the app needs to get it out there. Even writing the app’s description or taking screenshots for the App Store is a time-consuming process. So anything I can do to cut down on the time needed to release my app, the better I am. Therefore when I decided to have myDrumPad translated to other languages to widen my user-base, I wanted to do make it as painless as possible.
I tried tried to have friends and family who understood foreign languages help with translations, and while they were very well intentioned it really didn’t work out in the end. What I discovered was that there really is no substitute for hiring a trained professional. But luckily it doesn’t have to be outrageously expensive. Read on for more.
While developing myDrumPad, I came across an interesting problem for my in-app purchase support. The app allows users to download additional packs of sounds (referred to as “sound packs” in the app) that they can use to tap out songs and rhythms. The sound packs themselves were a collection of CAF-encoded uncompressed PCM audio files, with a single configuration file describing the labels and arrangement of the sound files on the drum pad’s grid of buttons.
I wanted to be able to add additional sound packs without issuing a new release of the app, but since the information describing the sound packs is largely static, I didn’t want to have to worry about maintaining a dynamic server for the app to continue functioning. I wanted it to largely be “fire and forget”.
What I came up with is, I think, a best of both worlds. The app functions without needing me to maintain a server, but I can still dynamically add additional resources to the app instantly. Read on to find out more.
I’ve been working recently on getting more exposure to my existing apps, especially myDrumPad. It’s a fun app, and I have a few more updates that are in the works when I get a couple of free weekends, but frankly I’d like to see its sales figures climb a bit higher than they are now. Of course, if you’re an iOS developer, you’ll know the biggest thing that can improve your sales rankings is to be featured on the AppStore. A large part of getting featured is left up to lucky chance, but to improve your odds, one of the things you can do is to target Apple employees with Facebook ads of your application. Read on to see the results I’ve had so far.
I’ve been considering starting a new project recently, and have been torn: Should I create my project using Three20, or should I use UIKit directly? I know Three20 is supposed to help by making applications easier to develop, but what does it really buy me as a developer? In my experience, most of my time with Three20 has been spent working around its various quirks. And from what I can tell from my recent research, it doesn’t seem so straight-forward to support Universal applications across iPhone and iPad devices.
Help overlay showing the Parking Mobility quick start help
As part of the Parking Mobility iPhone app I’ve been building, I wanted to integrate a simple “Quick Start” help guide to show people how to use the app without being intrusive. I wanted to use the project’s branding as much as possible, and give the user a feeling like they haven’t left the main portion of the app. So I wanted the user to be comfortable with it, and always have a quick way to close the help window to get back to the app.
One of the iPhone applications I’ve written, Parking Mobility, is primarily a map-based application. Since the iPhone’s screen is so small, we want to maximize the screen real-estate while still providing navigation bars for users to interact with. To that end, the app uses a black-translucent navbar and toolbar at the top and bottom of the screen. In the past this has never been a problem, and most mapping applications do the same thing. I recently submitted a huge update to the app which is a complete re-write as a 100% native Objective-C based application (all vestiges of PhoneGap having been removed). With this latest submission though, we’ve run into problems.
Read on for more, and what I’ve done to (hopefully) get around this.
I do most of my mobile development literally while I’m mobile; on the train during my morning commute, from coffee shops on the weekend, or in front of the TV in the evenings when I’m winding down for the night. Because of this, I don’t have any consistent time when I’m making checkins, nor do I have the time to create builds for my beta users.
Recently I was working on a refactor of one of my CPAN modules which, among other things, involved changing its name from Test::A8N to the specific Test::Story. Doing so made me think about the process I usually go through when I consider releasing a CPAN module.
My friend Scott McWhirter, who heads up the Vancouver Perl Monger’s group, asked me yesterday to give a last-minute talk on anything in particular at tonight’s Vancouver.pm meeting. He wasn’t exactly begging, but I know he’s short on speakers this month, and he wanted something interesting to show.
So I decided I’d talk about building and testing Perl-based projects using Hudson. I’ve been planning on writing a blog post on the subject for the past month, but haven’t found the time to finish off the post properly. So if you’re interested in the topic, and you don’t want to wait for me to get around to writing about it online, please feel free to drop by tonight!
I recently wanted to try my hand at writing a little iPhone app for helping students find University grant funding. It turns out to be a bit more difficult than I’d expected, but part of the app was to be a listing of all the available universities near the student. This, of course, would involve actually having a list of Universities. To make a long story short, once I got the list (Wikipedia rocks), I needed to get their locations so I could do a proximity search from the user’s coordinates. Since I didn’t want to spend too much time entering every one of the several hundred University names into Google, I decided to whip up a simple little script in Perl to do this for me.
It’s too bad I can’t use it at work, but HTTP::Engine rocks my world. It does “The Right Thing ™” for negotiating HTTP requests and their content in a wonderfully transport-agnostic way. That means that if you’re running in mod_perl, FastCGI, plain ‘ol CGI, or even running as a stand-alone development-mode daemon, it will just work.
At my work, we’re building new user interface components to our email security appliance product, and for the first time we’re building a web interface that will be used by a potentially high number of public users. Up until now, all of our target users were internal to our customers, meaning system administrators and a small number of workgroup users. Now however, their customers and the recipients of potentially a high number of emails will be able to interact with our appliance. This means we have to scale a lot higher than we have needed to in the past, all with limited hardware and memory.
It’s probably not the kind of Iron Man competition that you’re used to hearing about. This one is a challenge to blog at least once per week, every week, about Perl and Perl-related technologies.
My buddy Matt Trout, co-founder of Shadowcat Systems, creator of DBIx::Class, a core contributor to Catalyst, as well as all sorts of other great Perl goodies, is starting a blogging contest to try to get the word out that Perl is still alive and well, and perhaps try and overthrow the public perception that Perl is use old-school “use CGI;”. And he’s also a hilarious public speaker too.
Plenty of times in applications, especially on mobile devices, you just need to tell your users to hold their horses and wait while your application processes something in the background. Maybe you need to query some data from a remote server, save a file to disk, or maybe you just need to do some number crunching. Whatever the reason, you don’t want your user to think the program has crashed if you don’t give them some sort of visual feedback that you’re busy and they just have to wait a few seconds.
An important part to any application is issuing a simple alert to your user. Whether it’s to tell them about an error that just occurred, or if you need to ask them a simple question, giving a message to your user is about the most basic part of any app.
Sadly, when you try to rely on the ever faithful “alert()” function in JavaScript inside a PhoneGap application, you’ll notice the alert box it shows is titled with a very unprofessional “index.html” across the top. Not only does it make it obvious that the app they’re interacting with is actually HTML-based, but you can’t convey the importance of one message or another with a title. Most people only ever read the title anyway, so in order to provide this capability to your application, PhoneGap has an answer for this problem.
One of the integral features of the next application I’m releasing (I’ll write a post about it soon, honest) is the capability of saving a copy of the user’s work in my app to their Photo Library. For a while now I’ve been wanting to be able to save screenshots from within PhoneGap for two main reasons:
Be able to export the user’s work and allow them to email it, import it into other applications, etc.
Save a screenshot to their splash-screen image, that way when the application restarts it shows their previous state while they wait (for example, the Notes application on the iPhone).
I’ve implemented #1 right now, meaning with a simple non-blocking call you can save the current view to the photo library. In the future I’ll add another three options: Save to the default splash-screen image, save to a file, and save and upload to a remote location.
The ActionSheet is a handy control on the iPhone, and is a very intuitive way of getting a multiple-choice answer from a user in a modal but unobtrusive way.
Using it in PhoneGap makes interacting with your user easy, while keeping the display responsive. And as an added bonus, you don’t need to update any HTML or CSS to get the buttons to look right. The native iPhone codebase handles it for you.
Finally, what we’ve all been waiting for. Apple just announced that they’re allowing In-App purchases for free apps, and not just paid apps. This means, as an app developer, I can develop a single app for the app store for free, but can allow my users to upgrade to the full paid version without having to split it up into a “Lite” and “Full” version.
Its been a while since I’ve made an update to my blog, and I figured it’s far overdue for a new post. My life over the past little while has been divided up into 4 chunks: my family, my work, my weekend consulting, and my own personal application development. Somewhere around the second half of that list is sprinkled a bit of PhoneGap development.
PhoneGap vs Apple, resolved
First, I’d like to announce that I’ve made headway with my interactions with Apple. They were convinced by my argument that PhoneGap-based apps, just like any other apps developed by users who have access to a rich API, should be judged by their own merits and not prejudged based on what tools were used to built them. This is fantastic news, and means that apps submitted to the App Store will not be rejected solely because they’re built on PhoneGap. Now, if the application is buggy or if a developer tries to do something underhanded with it (for instance, changing the behavior of the app after Apple approves it) that is still cause for a rejection or worse consequences, but the same goes for any application released to the App Store.
Things have been busy over the past few days, which is the reason why I haven’t had a chance to post about this until now. But for the PhoneGap community, I have some good news and some bad news. First, the good news: I got a phone call from the Apple app reviewer that was reviewing my test app. And before I go any further, I want to say a few things.
I’ve made some quick updates on the train this morning, and ended up creating a Bourne shell script in the iPhone directory of PhoneGap for renaming a brand-new PhoneGap fork to whatever your project is called. This also works with the previous changes I made to my buildprocess branch, meaning that when you’re done, you shouldn’t have any references to PhoneGap in your code at all. It also makes developing quite a lot easier, since renaming my XCode project file by hand is cumbersome, and needs to be done every time I start a new project.
The PhoneGap demo is really starting to grow beyond the capacity of a single screen since tons of new features are being added all the time. It’s even showing a few examples of the tab and navigation bar features, but they didn’t really do anything beyond just throwing out alerts and log statements. I decided to change that to show just what’s possible with a PhoneGap app.
A while back David Roe had sent me a patch for an implementation of the ActionSheet control for PhoneGap. He was using it in an application of his, and probably due to my plea for patches from the PhoneGap community at large, he submitted this little tid-bit to me. Since I’ve been making some pretty big strides toward implementing a unified callback and event dispatch mechanism within PhoneGap, I refactored a bit of it, and created a generic Dialog class for PhoneGap.
I’ve been working on providing more feedback into JavaScript from the commands run inside of Objective-C. So far PhoneGap has been largely one-way, you push actions into PhoneGap and maybe you get some sort of response out in some general sort of way, but most of it has involved polling mechanisms. Well the DOM and JavaScript in general has a native facility for dispatching ad-hoc events. And it’s super easy to call from Objective-C, if only a little bit verbose:
I’m a big fan of all things Apple, and as you can tell from my past blog posts I’m a big fan of iPhone development. I’ve even dusted off my aging C skills, and have learned to love Objective-C. The one thing I haven’t learned to love, like all other iPhone app developers, is their application release process, and the seemingly arbitrary app store acceptance department.
Don’t get me wrong, I think how Apple fiercely guards the App Store to prevent bad, buggy, or offensive material from getting on there is a great thing. Some of my mother-in-law’s students in the class she works in have iPhones or iPod Touches, and these little 10-year-olds love the little apps I’ve put out. They’re fun, light-hearted, and they get a lot of enjoyment out of these and other apps. It’s reassuring to know that if I install an app, it won’t crash my phone (too badly) or that a child won’t be offended by them (too much).
I think work wrecked my brain a bit today. I have so many ideas running through my head, and just not enough time to catch up to them all. It happens to all of us from time to time, but the thing is I have so much fun with work, that it’s hard to moderate myself. I think I’m going to head home, listen to some Bob Marley, and when I meet up with my wife and her parents at the pub, I’m going to watch the hockey game, drink some beer, and enjoy my evening without technology.
I’ve merged the results of my UIControls branch on github into my master branch. I think my little experiment went well, and I’d love to get feedback from people on how this new API works for you. I still have some great plans for it, but before I get ahead of myself, let me cover what I’ve done:
Changes:
Refactored the command call API to allow for a richer set of arguments to PhoneGap commands
Moved some commands around to more appropriate classes (e.g. Alert and Vibrate both moved to Notifications)
Reorganized the XCode project so commands are clearly separated from PhoneGap infrastructure
Renamed the Settings.plist PhoneGap config file to PhoneGap.plist, and created a new Settings.plist file that contains custom application-specific configuration.
Made all PhoneGap commands inherit from a common base-class that auto-loads its own Dictionary of configuration from the main PhoneGap.plist file.
Added UIControls command class that exposes tab bars and toolbars to JavaScript.
Updated the demo to show off tabs and toolbars
All that looks like a big change, but almost all of it was infrastructure changes that were necessary to get UIControls to work. Previously, all PhoneGap commands were class method calls, meaning it was very difficult to maintain state between command calls. Now that commands are actually called on an instance of a given command class, it’s easier to maintain state. So when a tab bar is created, multiple calls can be made, each to construct different aspects of the UI. Without all this, the following example would have been much more complicated:
They say a picture’s worth a thousand words. Frankly I think inflation has really taken its toll on the cost of words, but nevertheless here’s a quick view of what’s been going on in my UIControls PhoneGap branch on Github.
In that screenshot the UIWebView frame, aka the actual webpage content of the app itself, was automatically resized so the toolbar and tabbar has room to be shown. And yes, those are native widgets for the toolbar and tabbar.
Last Thursday I went down to Nitobi after work for a couple of beer and a chat about PhoneGap before I had to go give a couple lightning talks at the Vancouver.pm Perl Mongers group. My hour chat with a couple of the Nitobi crew turned into over 2 hours, making me late for Vancouver.pm, but I think the effort was worth it. First off, they have good taste in beer. Second, I had an opportunity to do a little show-and-tell of my PhoneGap branch on Github. Not only did they like my changes, but I told them what my roadmap of features for PhoneGap includes, and I think they’re on board.
I’ve been working on some pretty fun changes to PhoneGap recently, which hopefully will be merged into the main branch soon. (Brock? Any word on that? It’s now 12 days, and counting) In my branch of PhoneGap I added console logging support, I implemented queueing of commands so they don’t walk over each other, and finally (and perhaps more importantly) improved the JavaScript build system and infrastructure.
PhoneGap’s JavaScript Structure
PhoneGap is broken up into several different .js files, each of which implements a part of the PhoneGap API. And with recent changes to PhoneGap’s Objective-C code, the implementations of those commands are divided nicely into their own separate classes. Additionally, there’s platform-specific implementation hooks of those APIs which make the necessary calls in to the native code that implements those commands. At build time, a Rakefile is used to compile these together into one single “phonegap.js” file that can be included into your application.
I’ve managed to avoid C and C++ programming for most of my career of 15 years. I’ve dabbled, and then I’ve run back to my favourite languages. Besides, as a web developer there hasn’t often been a need for me to delve that deeply into the machine.
Now that I’m developing iPhone applications, that’s all changing. I’m using PhoneGap to develop my apps, but some of it was buggy, and others just didn’t do what I needed to do. I’m integrating the AdMob and Medialets APIs into my application, which means Objective-C programming. After picking my way around, and continuing on the work my friend Scott McWhirter developed, I think I’ve come up with something that not only works well, but helped me to learn and love Objective-C.
I’m now a registered iPhone App Developer! After the usual waiting, emailing, phoning, and faxing that I won’t bore you with because blogs all over the world are full of people ranting about Apple’s registration process, I now have my developer key. (Personally, I don’t see what people are complaining about…it wasn’t all that painful.)
So now that I’ve written two iPhone applications, the first thing I wanted to do was load them on the phone and see how they actually behaved on real hardware. The results were, lets just say, less than thrilling. While they ran and did everything I would have expected of them, there are strange inconsistencies between the rendering of WebKit on the phone vs the desktop.
A few months ago I had the opportunity to meet with the crew developing PhoneGap down at their headquarters (Nitobi, down in Gastown district of Vancouver). It’s only a few blocks away from where I work, but the horrible downpour of rain made me think twice about going (hey, it is Vancouver after all). Next time I’ll bring my laptop with me, but it gave me an introduction to what they’re looking for help with, and where they’re taking PhoneGap.
I keep finding amazingly good blog posts or links of interest that I end up bookmarking for my own uses, but I end up having to tell people on a case-by-case basis why one article is good for one reason or another. I end up bookmarking on my Delicious account and sharing blog articles I like via my Google Reader account, but it’s becoming increasingly obvious that this isn’t enough.
At work I needed to perform an animation on a sprite-based image (e.g. one large image containing multiple stages within an animation, pre-rendered). Since there was no easy way within Mootools to iterate over an array of class names, I created one. I called it “Fx.Index”, but if you have a better name for it, please leave me a comment.
This code is taken straight from our product, which uses Mootools 1.11. So I’ll post an update once I port it to Mootools 1.2, at which point I’ll submit it to be added in the not-yet-created plugin directory.
I’m developing an Ajax web application in Mootools. Two actually, if you consider the work I do with my day job. At work we’re using the older 1.11 version of Mootools, but in the interest of helping this great project, I’m doing my spare-time development using version 1.2.
Mootools 1.2 makes it a lot more obvious how to extend and create your own subclasses of existing objects. Instead of writing all my fancy UI components as a series of functions within my page’s class object, I can create separate objects to handle individual features and call out when I need to. The workflow and API is much cleaner and is far more consistent.


 I love living in Canada, and I especially like living in Vancouver. I wouldn’t trade it for anything. I have a lovely wife, a great job, a wonderful city…what more could I ask for? Oh right, that’s it…warm weather! I’m not meant for frozen water falling from the sky, or bundling up into so many layers that I feel like an onion (or a parfait).

 For myDrumPad the main pad buttons are images. I create a UIButton object, and use setBackgroundImage:forState: to customize which image will be used for each state (UIControlStateNormal and UIControlStateHighlighted mainly). I customize the title label font, shadow and color, and voilà I have a pad button that simulates the look and feel of a Korg padKONTROL. There’s just a few small problems with it.


 They say a picture’s worth a thousand words. Frankly I think inflation has really taken its toll on the cost of words, but nevertheless here’s a quick view of what’s been going on in my UIControls PhoneGap branch on Github.